Ahoy, mateys! As a seasoned pirate who's navigated the treacherous waters of the Sea of Thieves for years, I can tell you that the Siren Shrines remain some of the most thrilling and rewarding challenges in the game. Even now, in 2025, the Shrine of the Coral Tomb stands as a classic test of wits and courage. It’s a place where puzzles lurk beneath the waves, and one wrong move could leave you sleeping with the fishes—or worse, the sirens! But fear not, for I've charted these waters many times, and I'm here to guide you through every coral-encrusted corridor and lever-pulling puzzle. Are you ready to claim the sunken treasure and uncover the secrets of the deep?
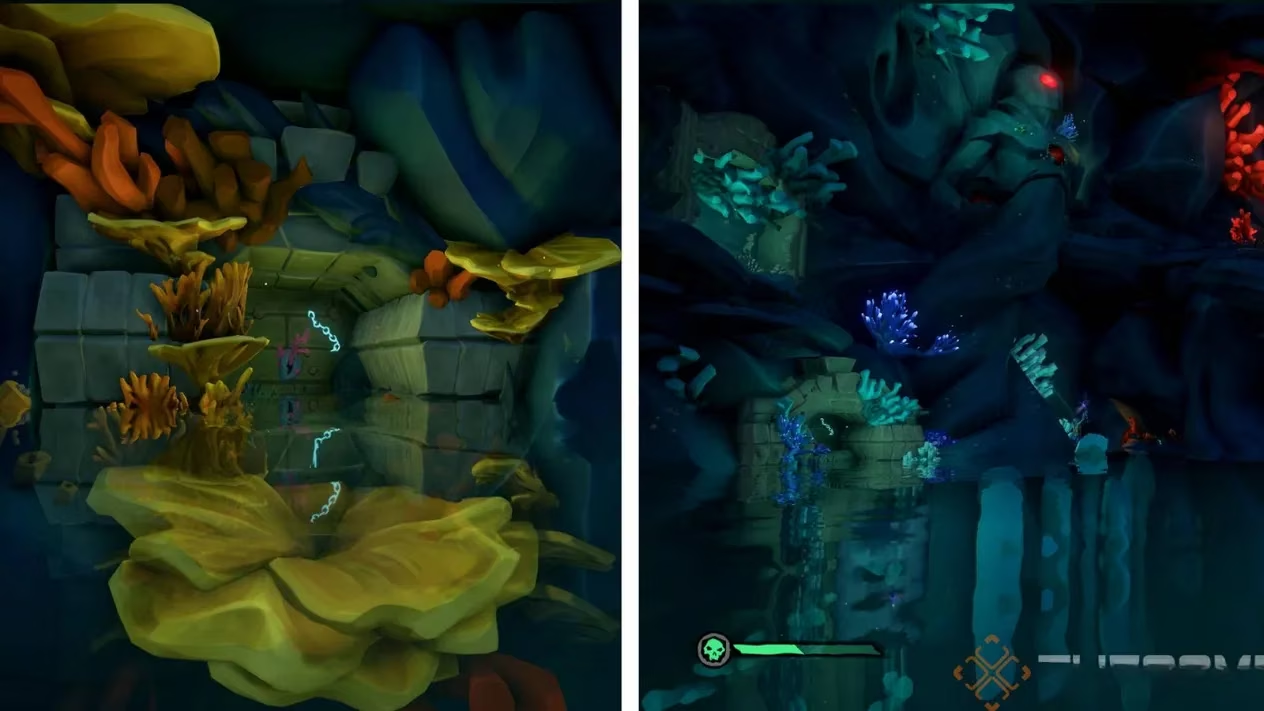
The journey begins when you locate the shrine on your map. Dive down, and you'll be greeted by a mesmerizing Siren Window. Don't just admire it—shoot the blinking coral above it to shatter the barrier and gain entry. Inside, you'll find a small chamber with supply barrels. But the real path forward is through a hole where water cascades down. Take a leap! It's like a pirate's water slide, a thrilling ride that plunges you into the heart of the shrine. You'll land in a pool, often with some tempting loot shimmering below. This is just the appetizer; the main course of puzzles awaits.
Now, let's talk about the core mechanics. Remember the Siren Statue puzzles from A Pirate's Life tales? Well, the Coral Tomb uses a similar logic but with a twist. Instead of hitting statues, you'll be pulling levers. Your first task is to look for a specific picture on the wall. This mural is your key.
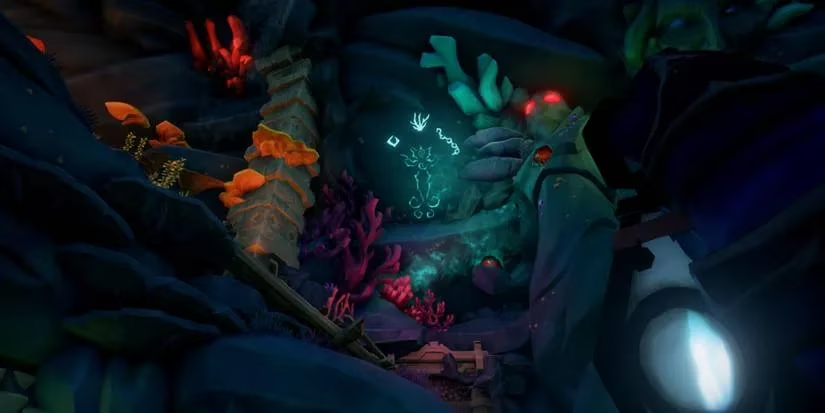
This image shows three symbols: a gem, a coral branch, and a chain. This sequence is immutable. No matter what, you must always pull the levers in this exact order: 1. Gem, 2. Coral, 3. Chain. Got it? Good, because you'll need to apply this rule three separate times, each marked by a different colored coral glowing around the levers.
The First Puzzle: Blue Coral Levers
The initial set of levers is encircled by a soft, glowing blue coral. Here’s where to find each one:
-
Gem Lever: Dive to the very bottom of the main pool. It's hard to miss.
-
Coral Lever: Swim across from the gem lever, keeping an eye out behind a sturdy stone pillar.
-
Chain Lever: This one is easier to spot from the water's surface. Don't forget to come up for air!
Pull them in the sacred order—Gem, Coral, Chain. If you hear triumphant music, see statues above glow red, and notice secret entrances grinding open, you've succeeded! But be warned: success attracts company. Sirens will swarm you, so deal with them before exploring the newly revealed areas.
The Second Puzzle: Yellow Coral Levers
With the blue puzzle solved, the shrine opens up. Now you're hunting for levers surrounded by vibrant yellow coral. The search becomes more adventurous:
-
Gem Lever: Head to a new area, accessible just past a Sunken Merfolk Statue on the water's surface.
-
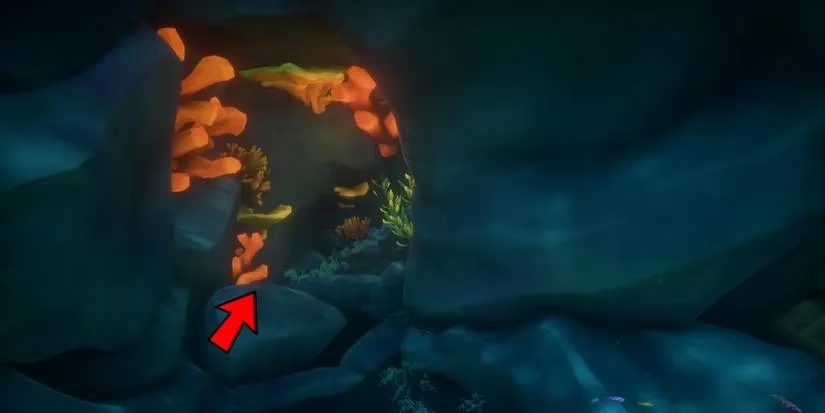
Coral Lever: This requires an underwater excursion. Look for a distinctive patch of large, red coral that serves as the doorway to its chamber.
- Chain Lever: Fortunately, this one isn't far from the previous chain lever you found, still on the surface.
Repeat the ritual: Gem, Coral, Chain. More triumphant music, more glowing statues, more secret passages, and yes—more sirens to fight. The shrine is slowly coming alive!
The Third and Final Puzzle: Red Coral Levers
The grand finale features levers wreathed in fiery red coral. This is where your navigation skills are tested.
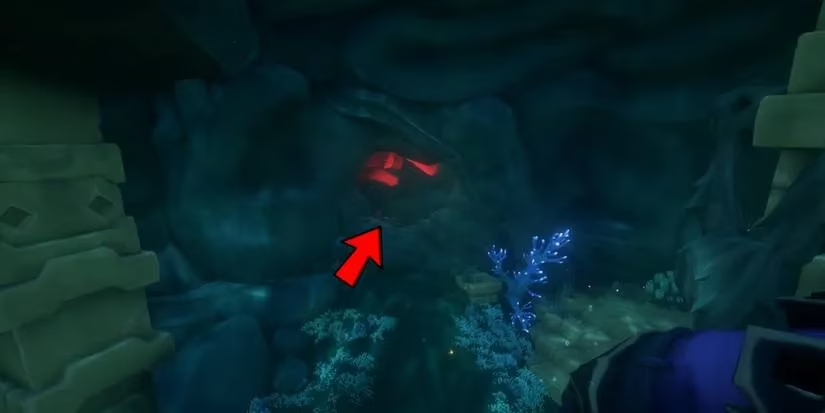
- Gem Lever: Find an entrance marked by red coral with blue coral on its outer edges. Swim through to discover the lever.
-
Coral Lever: From the location of the yellow coral chain lever, swim down and to the right. You'll find a new cavern housing this lever.
-
Chain Lever: By now, you're a pro at finding these. It's conveniently located near the other chain levers on the surface.
Execute the final sequence. If done correctly, you'll witness a dramatic change: water will flood into the central chamber, raising the water level and granting access to the shrine's previously unreachable upper tiers. Now, the real treasure haul begins! Gather every chest, skull, and trinket you can find. Remember to store it all safely using the Sunken Merfolk Statue at the very top level of the shrine for convenient collection later.
But what's a true pirate adventure without uncovering hidden lore? The Shrine of the Coral Tomb holds five secret journals that piece together the tragic history of the Sunken Kingdom. As someone who loves a good story, I never leave without them. Here’s my personal log of their locations:
| Journal Number | Title | Location Clue |
|---|---|---|
| 1 | Seashell Earring | After the waterslide, swim to the bottom of the landing pool. It's right next to an ammo chest. |
| 2 | A Hidden Kingdom | After solving the first (blue) lever puzzle, head to the area with the yellow coral gem lever (right of a Merfolk Statue). The journal is beside it. |
| 3 | The Sea Queen And Her Warrior | After the second (yellow) puzzle, go beneath the yellow chain lever, swim down and right to the new coral lever area. It's in the entrance on the right. |
| 4 | The Whispering Plague | After the final (red) puzzle, water fills the shrine. Go to the new upper area with multiple skulls embedded in a wall. Find it next to a pile of skulls. |
| 5 | The Sunken Kingdom | At the very top level of the shrine, near the Merfolk Statue and walls of skulls. Look to the statue's right, next to a skeletal ribcage on the ground. |
So, is the Shrine of the Coral Tomb worth the effort in 2025? Absolutely! 🏴☠️ It's a masterfully designed environment that combines puzzle-solving, combat, and exploration. The lever mechanic is simple to learn but satisfying to execute, and the environmental storytelling through the journals is top-notch. Just remember my golden rules: stick to the symbol order, always be ready for a siren fight, and never leave a journal behind. Now, set your sails, dive deep, and may the wind—and currents—be ever in your favor!