Ahoy, mateys! Gather 'round the grog barrel and lend an ear. So, you fancy braving the soggy depths of the Shrine of the Flooded Embrace in Sea of Thieves, eh? Let me tell ya, it ain't no pleasure cruise down there. It's more like swimming through Davy Jones's cluttered attic, filled with the ugliest, most tone-deaf mermaids you ever did see – the Sirens. Seriously, their singing? Makes a cat fightin' in a sack sound like a symphony. But fear not! Yer ol' pal here has swum these cursed waters more times than I've changed my socks (which, admittedly, ain't sayin' much), and I'm gonna spill the beans on how to grab the shiny loot and find those pesky journals without ending up as fish food. Consider this yer treasure map to not gettin' utterly wrecked. 🏴☠️💦
Navigating This Watery Nightmare (Or, How Not to Panic When Your Lungs Scream)
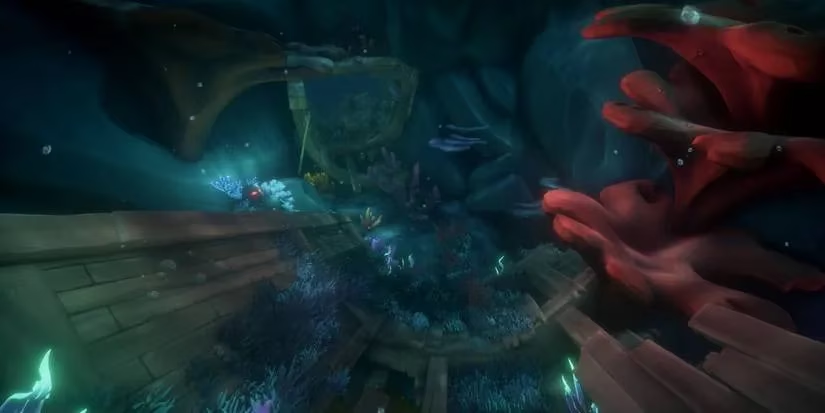
First things first: finding the darn place. You'll be diving down to a graveyard of ships lookin' sadder than a landlubber on payday. There are two ways in, both involve swimmin' through sunken hulls. One's perched right on top like a wonky hat, the other's jammed into the side like an afterthought. Pick yer poison!
Yep, that's the front door. Try not to bump yer head.
The second you splash inside, brace yerself. That annoyin' Siren song will hit ya – pure auditory torture. This whole shrine is basically one giant bathtub. Water, water everywhere, and not a drop you can breathe! 🤯 But don't ye fret like a bilge rat. Keep yer peepers peeled for:
-
Air Pockets: Little bubbles of sweet, sweet oxygen heaven. Find 'em, love 'em.
-
Bubbling Coral Tubes: Nature's scuba tanks! Swim through these bad boys for a quick O2 top-up. Essential, mate. Essential.
Unlike some shrines that make ye jump through hoops like a circus seal, the Flooded Embrace is blessedly straightforward, if you ignore the constant threat of drowning and being stabbed by fish-ladies. It's basically:
-
Swim.
-
Get jumped by Sirens (ugh).
-
Blast 'em back to whatever watery hell they crawled from.
-
Spot shiny coral treasure.
-
Grab it!
-
Repeat steps 1-5 until yer pockets are heavier than a Kraken's conscience.
Pro-Tip: The really good stuff? Coral Captain's Chests, Siren Gems? They like to hang out at the very bottom, usually inside the most depressing-looking shipwreck down there. Feels like they're hidin' it out of spite!
Where's the Loot, Ye Scallywags? 💰
Alright, down to brass tacks. Where do ye fill yer boots? Besides the obvious sparkly bits scattered about like seashells after a storm:
-
The Siren Window Room: See a fancy window glowing? Shoot the blinkin' coral next to it! Boom, access granted. Inside, you'll find:
-
The Sunken Merfolk Statue (yer loot storage buddy – use it!)
-
An ammo chest (Praise the Deep! You'll need it.)
-
Supply barrels (For patchin' holes... in yerself, mostly)
-
More loot, obviously!
-
-
Keep an Eye Peeled for the Trident of Dark Tides: This magical glowstick isn't just for raves under the sea. It absolutely melts Sirens. Finding one down here is like gettin' handed a golden ticket. Grab it! Makes life infinitely less stabby.
The Journal Hunt: Five Soggy Pages of Siren Gossip 📜
Now, for the lorehounds and completionists – those five hidden journals. Finding 'em in this flooded maze is like tryin' to find a specific barnacle in a hurricane. But I gotcha covered!
-
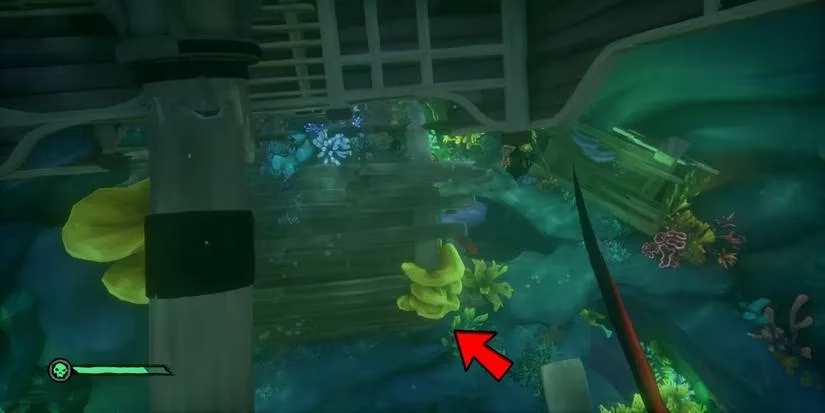
Journal 1: Shrine Of Flooded Embrace
-
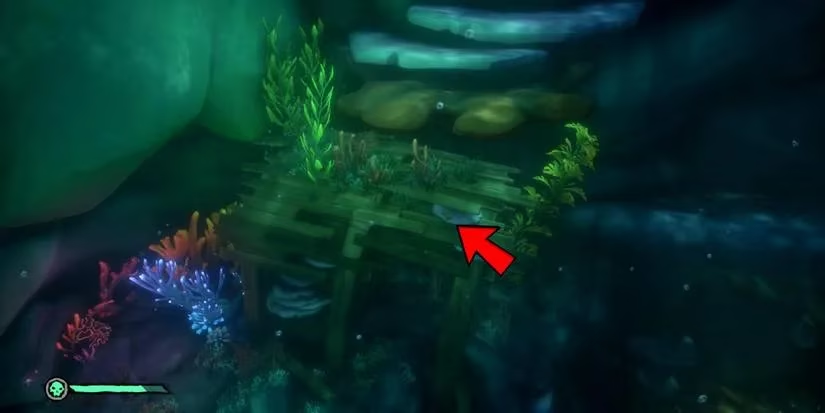
Swim in, look up. See that ship lookin' like it had one too many rums and capsized? That's yer target.
-
Swim up into that upside-down hull entrance. Get some air, then spot the journal chillin' right next to some cheerful yellow coral inside. Easy peasy.
See? Told ya it was upside-down. Told ya about the yellow coral too.
-
-
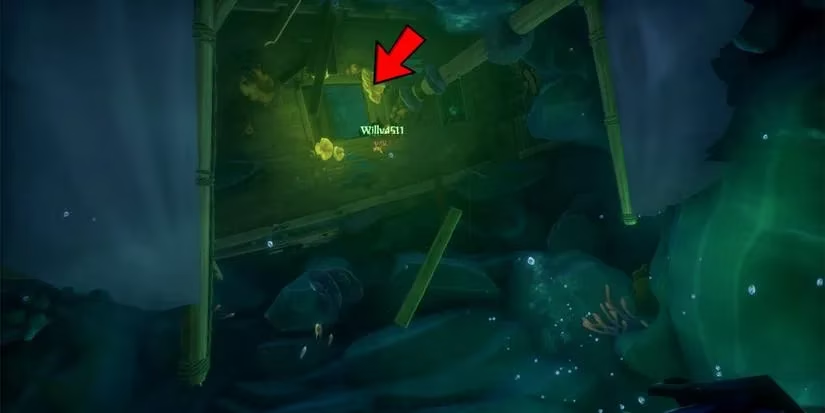
Journal 2: The Sirens
- Leave Journal 1's ship. Right below ya, there's another upside-down wreck, this one lookin' like it got hugged too hard by some giant yellow coral. Can't miss it.
Yep, that's the one. Looks cozy, right? Wrong.
- Swim under the ground this wreck is sittin' on. Find a hatch, give it a good yank open, swim inside. Journal and bonus loot await! Score!
-
Journal 3: Mermaid Gems
-
Remember that fancy Siren Window room we talked about? The one with the statue and ammo?
-
Once ye blast yer way in, look directly across from the Sunken Merfolk Statue. The journal's just loungin' on some soggy wooden planks. Couldn't be simpler... if ye found the room first!
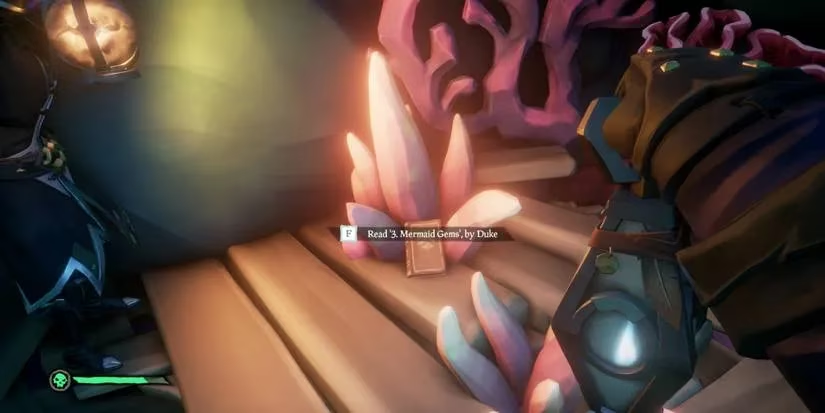
Right there. Mocking you from the dry-ish spot.
-
-
Journal 4: Siren Gems
-
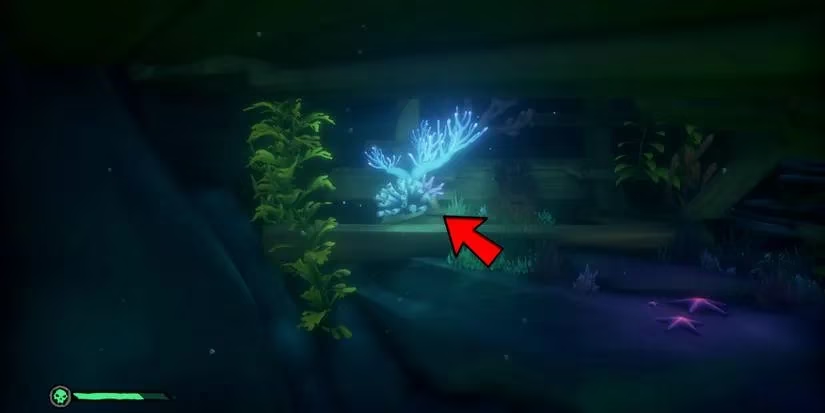
Swim down from the Siren Window room. Keep yer eyes peeled for... you guessed it... another upside-down shipwreck! This one's a bit more... spread out.
-
The journal ain't hidin'. It's just lying right on top of the wreckage on a flat bit of blue coral. Like it's sunbathing. Cheeky thing.
See the blue? See the flat bit? See the book? Bingo.
-
-
Journal 5: A Great Battle (The Deepest, Darkest One)
-
Time to go deep. Real deep. Swim all the way down to the absolute bottom of the shrine. It's murky, it's spooky, it's probably got more Sirens.
-
You'll see a final shipwreck and, weirdly, a big ol' red throne (fancy, right? Where the Breath of the Sea usually chills).
-
Look to the right of the wreck and the throne. Spot some glowing blue coral like a neon sign in the gloom. The last journal is just leanin' against it, probably exhausted from bein' so deep.
The glow gives it away. Almost makes the trip worth it... almost.
-
And there ye have it! The Shrine of the Flooded Embrace: less complicated than deciphering a drunk Kraken's map, but twice as wet and annoyin' thanks to those singin' sea-harpies. Remember: Air pockets are life, the Trident is yer best friend, and stash that loot with the Merfolk Statue before ye swim back up! Don't be greedy and drown, ya fool. Now if you'll excuse me, I need a very large, very dry rum. Fair winds and try not to get eaten! 🍻⚓